
Tile can make a small room easier to read, or make every narrow dimension more obvious. The difference is not simply a light color or the largest slab in the showroom. Format, joints, finish, direction and the position of cuts work together to guide the eye.
A compact bathroom, entry, kitchen or corridor has little room for competing lines. Repeated small tiles with strongly contrasting grout can turn the surface into a grid that emphasizes the room’s limits. A considered layout can instead establish continuity, extend a perspective or draw attention toward a useful focal point.
The aim is visual clarity, not a claim that the room gains physical floor area. Our wood- and stone-look tile guide explores material effects that can contribute without making the surface unnecessarily busy.
Read the room before selecting the format
Start with what will be seen first: joints, cuts, the main axis, the light and the wall that attracts attention. A tile does not arrive in an empty rectangle; doors, thresholds, equipment and irregular corners shape its actual layout.
Large formats can reduce visible joints and create a more continuous surface. That can help in a small bathroom, compact entry or narrow kitchen. But an oversized tile can also leave awkward fragments at the edge and create excessive waste.
Count the full tiles that fit across the important width and length. The design guidance uses a layout producing more than 50% waste, or particularly conspicuous cuts, as a reason to reconsider the format. That is a warning about a poor layout, not the normal allowance to add to an order.
A medium format can be the more coherent choice when it places whole tiles well and controls the perimeter. The best format is the one that works with the measured room, not necessarily the one with the fewest joints in a showroom display.
Coordinate joint width and surface preparation
The original planning ranges distinguish approximately 2 to 3 mm joints for suitable rectified tiles and around 3 to 5 mm for non-rectified products. Check the actual tile, installation system and applicable requirements rather than assuming every rectified product permits the same narrow joint.
The guidance also discusses applying adhesive to both support and tile back for formats beyond 60 × 60 cm. The essential requirement is the appropriate installation system and coverage for the tile and use. Do not treat one size threshold as a substitute for manufacturer instructions or local installation standards.
A flat support is particularly important with large tiles. Differences in level become visible under raking light, and an attractive material will not hide poor preparation. Tile layout and substrate assessment belong before the final order.
A large-format example within a 70 m² apartment
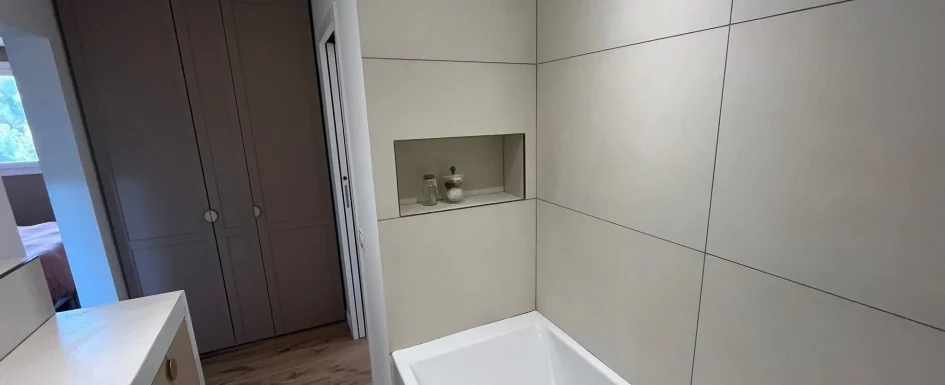
One renovation used 60 × 120 cm tiles in the bathroom of a 70 m² apartment. The room still had to fit a 90 × 120 cm shower, a 140 cm vanity with an 80 cm black basin, and a bidet.
The apartment area is not the bathroom area. The relevance of the example is that the tile layout was drawn around every fixture before ordering, allowing the large format to work within the actual room.
Light tile and black equipment created sufficient structure without adding several competing patterns. Integrated shower niches supplied storage without another projecting cabinet in the circulation.
This is a useful alternative to the idea that small rooms must always receive small tiles. The format succeeds because its cuts, equipment and joints were coordinated, not because its size alone guarantees a spacious result.
Use color and grout as one surface decision
Off-white, beige, pearl gray, stone, sand and greige can give a small room a lighter, more open reading. A very cold white can nevertheless feel harsh under the actual lamps, so compare samples with the intended lighting.
Grout close to the tile tone usually makes the surface more continuous. A strongly contrasting joint can be a deliberate graphic choice, but it also makes the grid more visible. Decide whether that is the line the room needs.
Satin finishes can provide a luminous effect with less conspicuous reflection than a highly glossy surface. Gloss can add reflected light, but floor use and wet conditions require particular care. Matte finishes can feel softer while reflecting less light; matte appearance does not by itself establish slip performance.
Cement-based grout can suit ordinary wall and floor applications. A correctly specified epoxy grout may offer useful stain resistance in a shower or backsplash, but it is not a substitute for waterproofing. Compare a cured sample dry and wet, since wet joints often appear darker.
Choose a laying direction that supports the room
Straight laying gives a calm, structured reading. Its alignment with walls, thresholds and fixed elements must be considered together, particularly where existing corners are not perfectly regular.
Diagonal laying can change how the eye reads the corners and depth. It also introduces more cuts. Plan the perimeter so the effect is not undermined by a collection of tiny triangular pieces.
A chevron or appropriately angled plank composition can direct the eye along a clear axis, especially with rectangular or wood-look products. It requires precise layout and a prepared support; the arrow-like effect is not achieved simply by turning a few tiles at random.
The direction should support the main perspective. A poorly chosen axis can make the room feel shorter even when the material is pale. Examine the layout from the entry as well as from directly above on the drawing.
See our projects in video
Real floor plans and renovations explained step by step on the ArchiWorking YouTube channel. Watch how spaces are reworked before the works begin.
Match the technical surface to the way the room is used
A bathroom floor must account for water, barefoot use, cleaning and the surrounding wet-area assembly. Visual continuity between the shower wall and other surfaces can help the room read as a whole, but technical suitability comes first.
The French discussion refers to barefoot slip categories A, B and C under DIN 51097, with B mentioned for a level-entry shower. It also refers to R classifications under DIN 51130, including R9 to R10 for certain interior entry or kitchen examples.
These are classification references from the article, not universal legal specifications for every US or Spanish home. Barefoot and shod-use tests answer different questions. Confirm current product declarations and the requirements for the actual wet or dry location.
Through-body or glazed porcelain is a versatile, low-porosity option available in stone, wood, concrete and terracotta effects. The actual finish and intended application still need checking; similar appearance does not make all products interchangeable.
The small-bathroom planning guide considers the surrounding doors, shower and storage. In an entry, prioritize wear, cleaning and a layout that gives direction without narrowing the perceived route. In a kitchen, coordinate cabinets, toe kicks, thresholds, fronts, worktop and walls before fixing the tile grid.
The nine checks before kitchen renovation places those finish decisions within the broader preparation.
Give patterns a job instead of covering everything
A pattern can mark a function, draw the eye to the far wall or provide one focal point. A shower back, niche, backsplash, defined central area or accent wall can carry character without turning every surface into a competing graphic.
Mosaic can be useful in a shower return, niche or selected detail. Used everywhere, it may multiply joints and restore the grid effect the room was meant to avoid. It is not forbidden in small spaces; it simply needs a deliberate role.
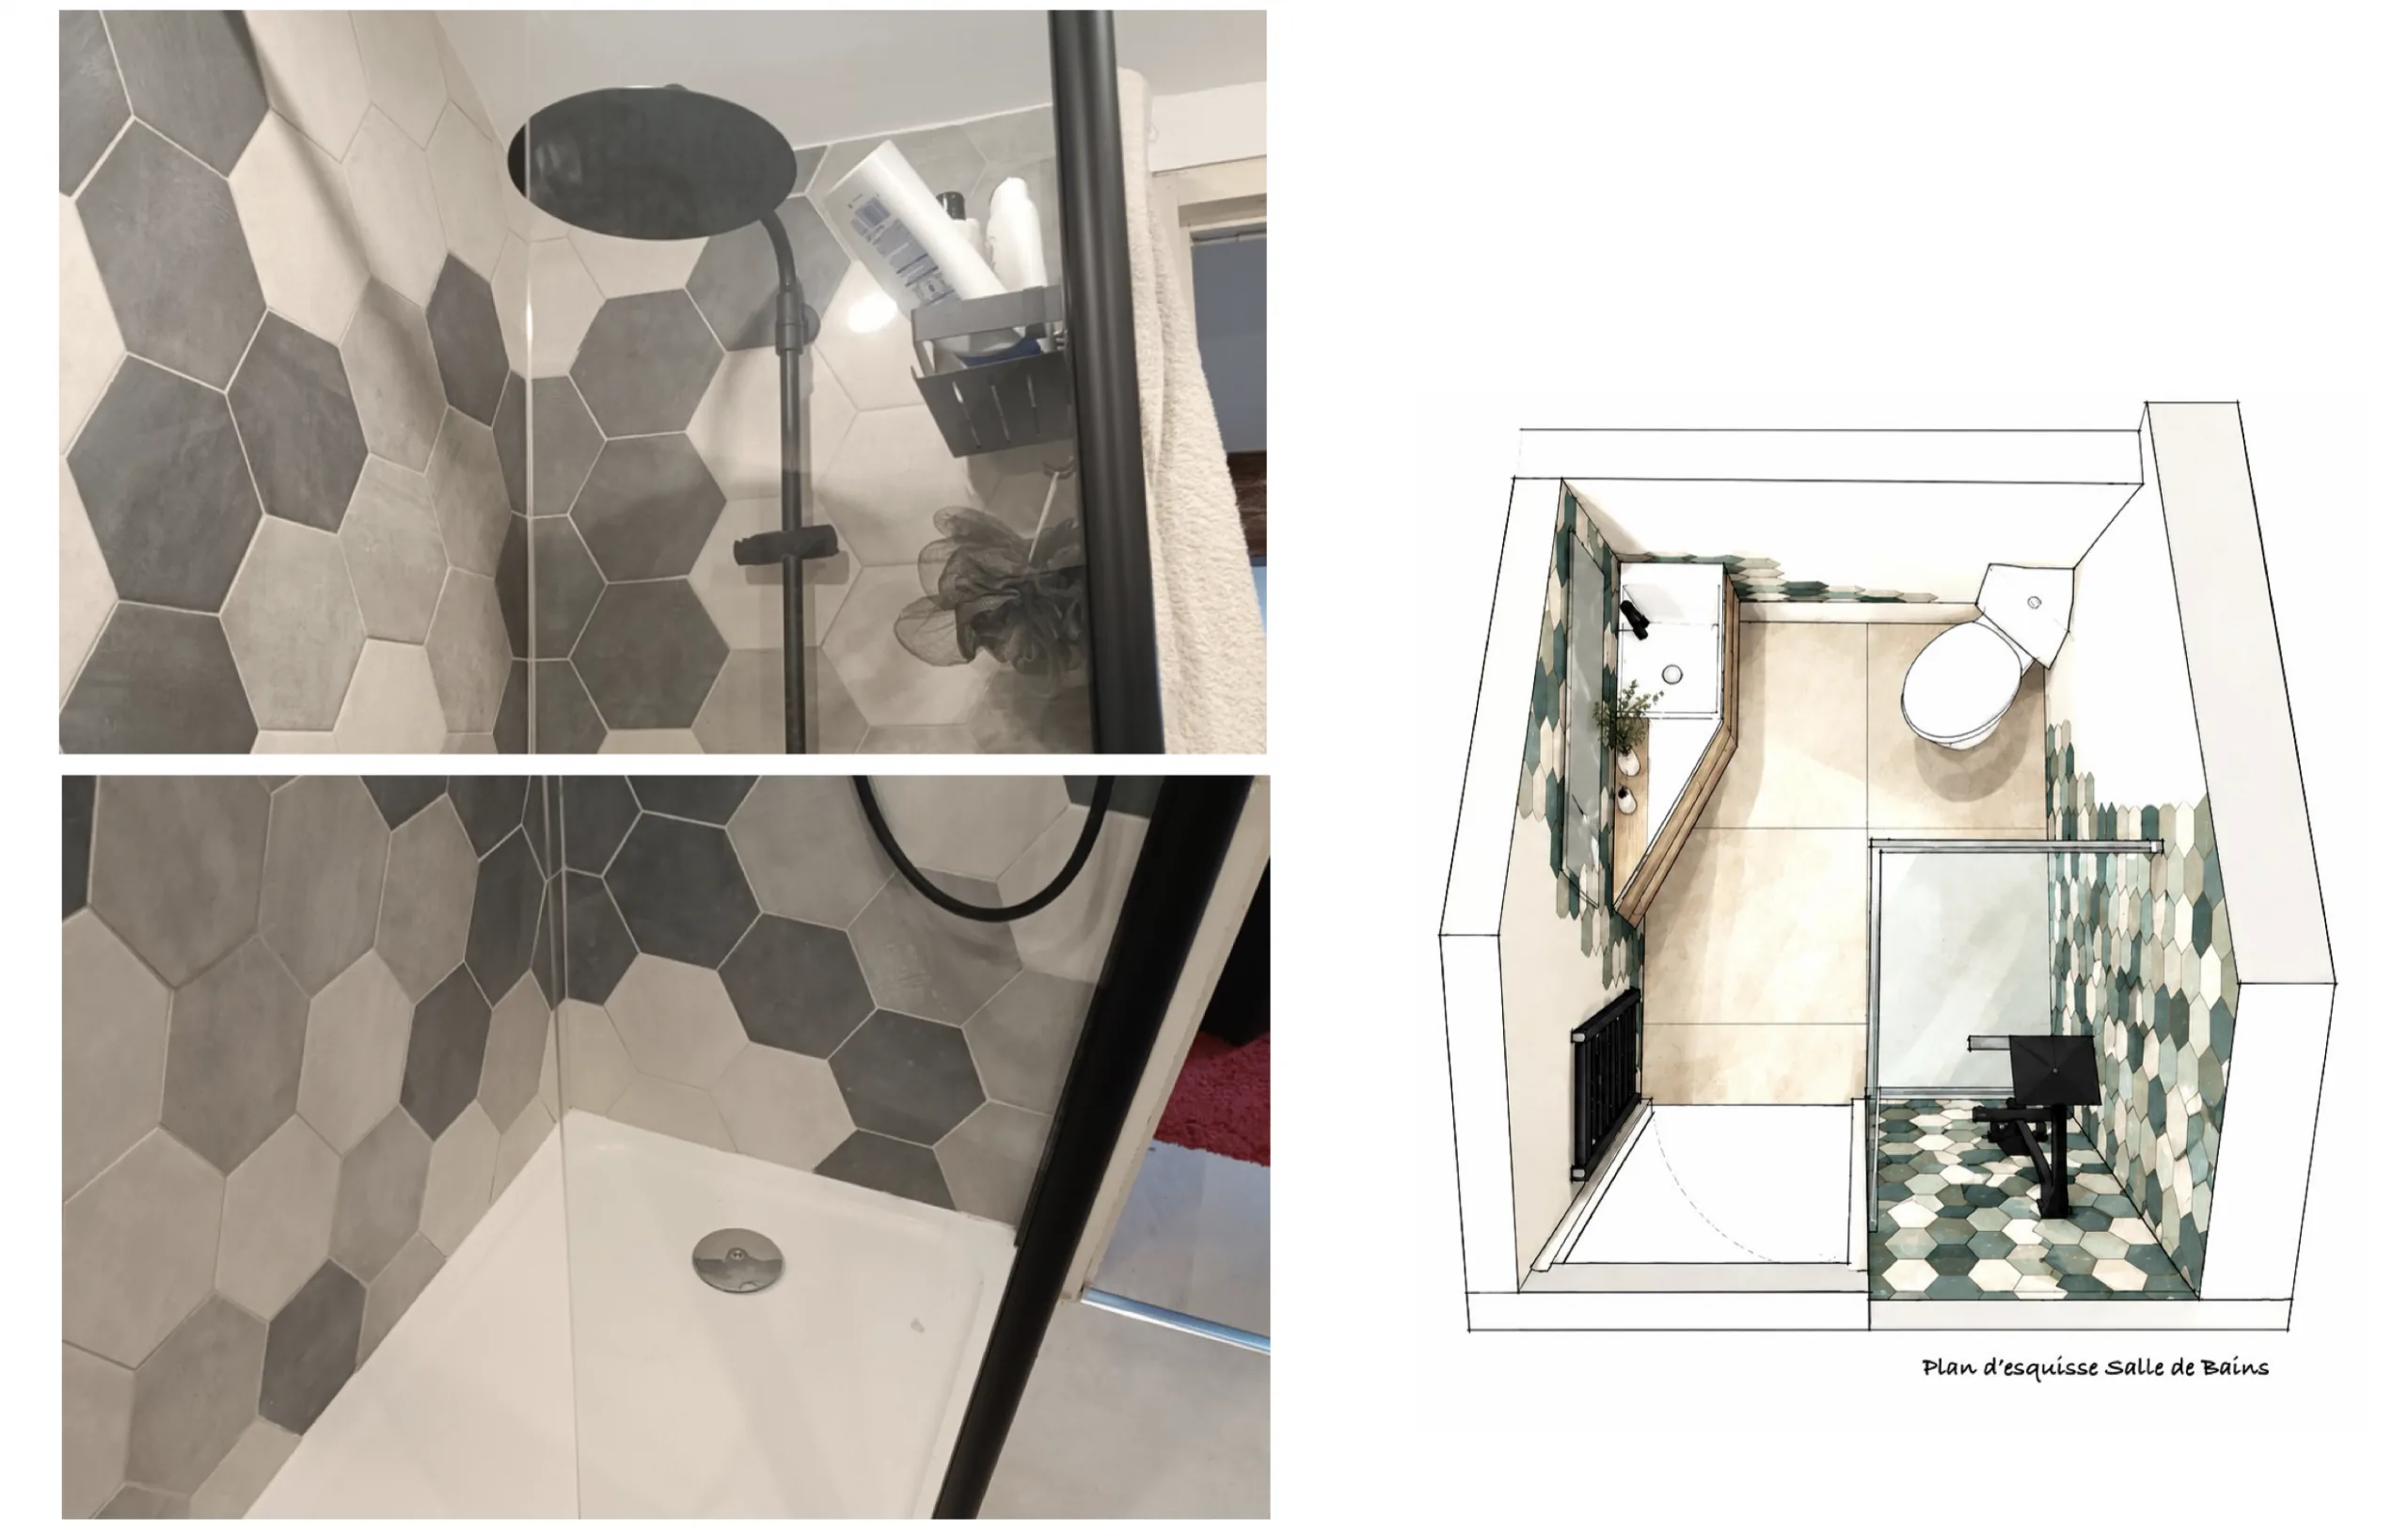
In one compact primary-suite bathroom, the floor used 80 × 80 cm tiles with a raw-stone character, while the shower wall received hexagonal terracotta-style pieces. Black shower fittings and a white tray complete the photographed example.
The contrast comes from scale and texture while remaining connected with the adjoining bedroom. The junction between the different coverings needs planning from the layout stage. The accompanying sketch shows the larger stone-effect floor alongside that wall treatment.
Our cement-tile guide considers another way to make a patterned rug or accent wall, including the distinction between actual cement products and porcelain alternatives.
A 3 m² shower room with two tile scales
A separate 3 m² example combines two large 120 × 240 cm tiles on the back wall with a medium-format floor laid diagonally. The wall reduces visible joints and emphasizes height, while the floor changes the reading of the corners.
Together, those scales can make the room feel less confined without pretending its area has increased. The result depends on controlled cuts, suitable joints and the actual wall and floor dimensions.
Such large pieces require appropriate handling, suction equipment and a suitable trained crew. The project guidance mentions two-person handling, but the tile’s weight, format and manufacturer’s instructions determine what is safe. Do not assume that two people are always sufficient for every large slab.
Before ordering, check the delivery route through the entrance, stairs or elevator. A tile that fits the finished wall can still be impossible to bring into the apartment intact. That practical check belongs with the layout, not on delivery day.
Prepare the support as carefully as the visible drawing
Check flatness, soundness, priming, leveling, the required wet-area protection and adhesive compatibility. Those stages must be appropriate to the project and product system rather than copied as a universal sequence.
Our support preparation before bathroom tiling develops those questions. A selected joint width and an attractive pattern cannot compensate for a support that moves, is uneven or has not received the necessary preparation.
The project video also shows a bathtub replaced by a large shower with two illuminated tiled niches. The tile discussion begins around 02:23; the bathtub-to-large-shower case study gives the wider construction context.
Order from the layout, then allow for cuts and repairs
The source guidance suggests approximately 10% extra for straight laying and around 15% for diagonal or chevron work. Treat these as initial allowances: the actual layout, breakage risk and format determine the final order.
This normal ordering margin is different from the earlier warning about a layout wasting more than 50%. If the design creates disproportionate waste, reconsider it rather than assuming a standard allowance will solve the problem.
Check that the boxes come from the same production batch where relevant to shade and calibration. Keep some spare tiles for repairs, particularly if the reference may later be discontinued.
A complete bathroom also needs a clear priced scope. Our bathroom-estimate checklist helps connect material choices with support preparation, waterproofing and installation rather than comparing the visible tile price alone.
A practical review before committing
Bring the room measurements, equipment positions and material samples into the same review. Ask where the first complete tile will sit, what remains at the opposite wall, and whether the doorway exposes an awkward cut. Check the shower, vanity and threshold rather than assessing an empty floor outline.
Then test the intended visual hierarchy. Is the eye following the main direction, reading every grout line, or moving toward the selected accent? A patterned niche or wall is easier to judge when the surrounding surfaces have already been considered. The aim is to know which element leads, rather than asking several finishes to do so simultaneously.
Finally, connect appearance to execution: flatness, wet-area suitability, joint specification, access for large pieces and the actual cutting allowance. A beautiful sample cannot answer those questions on its own. Drawing the layout before confirming the reference makes it possible to change the format while it is still a design choice rather than a costly site correction.
Questions about tile in small rooms
Must the tiles be large?
No. Large formats reduce joints but may produce poor cuts. A well-proportioned medium format can give a clearer result in the actual room.
Which color makes the room feel more open?
Light, soft tones often help, but the lighting and grout matter too. Compare the whole surface rather than treating the tile color as the only decision.
Are patterns incompatible with a small area?
No. Give them a defined location and role. A niche, backsplash or accent wall can provide character without competing with every other surface.
How can the grid effect be reduced?
Coordinate format, low-contrast grout, cuts and direction. The objective is a readable surface, not a rule that every room must be completely plain.
How much spare material is needed?
The 10% and 15% references are starting points. Calculate from the actual layout, confirm batch consistency and retain a repair reserve appropriate to the job.