
An entry corridor, an open kitchen and a living room can share one apartment without feeling connected. In this 86 m² French T4 apartment, the problem was not a shortage of rooms so much as a lack of coordination between them. The design linked routes, furniture and services rather than beginning with a wholesale structural transformation.
The entry needed to prepare the arrival into the living area. The kitchen needed to stop consuming a disproportionate share of the common space. Bedrooms, storage and utility rooms also had to match their actual uses. A coherent plan brought those decisions together before individual pieces of furniture were chosen.
This case study follows the proposed relationships and the recorded project figures. The dimensions are specific to this apartment, not general clearance rules or a substitute for checking the measured drawing. The custom entry furniture in a corridor article develops the arrival arrangement in more detail.
Diagnose the disconnected rooms first
The existing entry was 125 cm wide and opened directly into a large living area, without a clear transition. A kitchen return 250 cm long occupied too much of the common room, leaving the lounge with less usable space than the apartment’s overall size suggested.
Opposite it, the sofa and television unit did not establish a clear planned relationship. The primary bedroom had open, freestanding closet furniture, while the two secondary rooms, used as a child’s bedroom and an office, were poorly assigned in relation to the available light.
The aim was therefore not to demolish everything. It was to change furniture positions, routes and selected partitions so that one zone could support the next. An entry should not be planned independently of the kitchen it faces, or a kitchen independently of the living room it leaves behind.
Use a shallow entry unit as a hinge
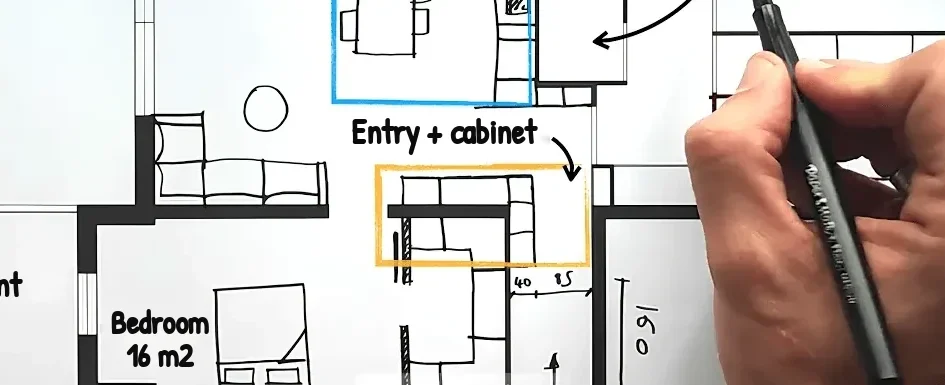
The entry composition uses three 40 cm cabinet modules with a bench, a place for small belongings, shoe storage and space for jackets. The unit projects slightly toward the living area instead of stopping as an isolated corridor object.
That projection establishes the beginning of the connection to the kitchen. A shallow unit, around 35 to 40 cm where appropriate, can hold daily belongings while taking less of a constrained route than a deep wardrobe. An integrated seat also avoids adding a separate bench elsewhere.
At the 125 cm-wide section, a 40 cm-deep unit leaves 85 cm. These are the coherent cross-sectional figures in the design. A separate 160 cm passage dimension mentioned in the project notes must be located and confirmed on the measured plan; it cannot also describe the same 125 cm-wide section.
The notes also mention 70 cm as a functional reference. Neither that figure nor the 85 cm project clearance should be presented as a universal legal or accessibility minimum. Check the actual route, door operation, users and local requirements before approving the cabinetry. A favorable subtraction alone does not establish that a main passage is suitable.
Keep the entry-furniture budget within its actual scope
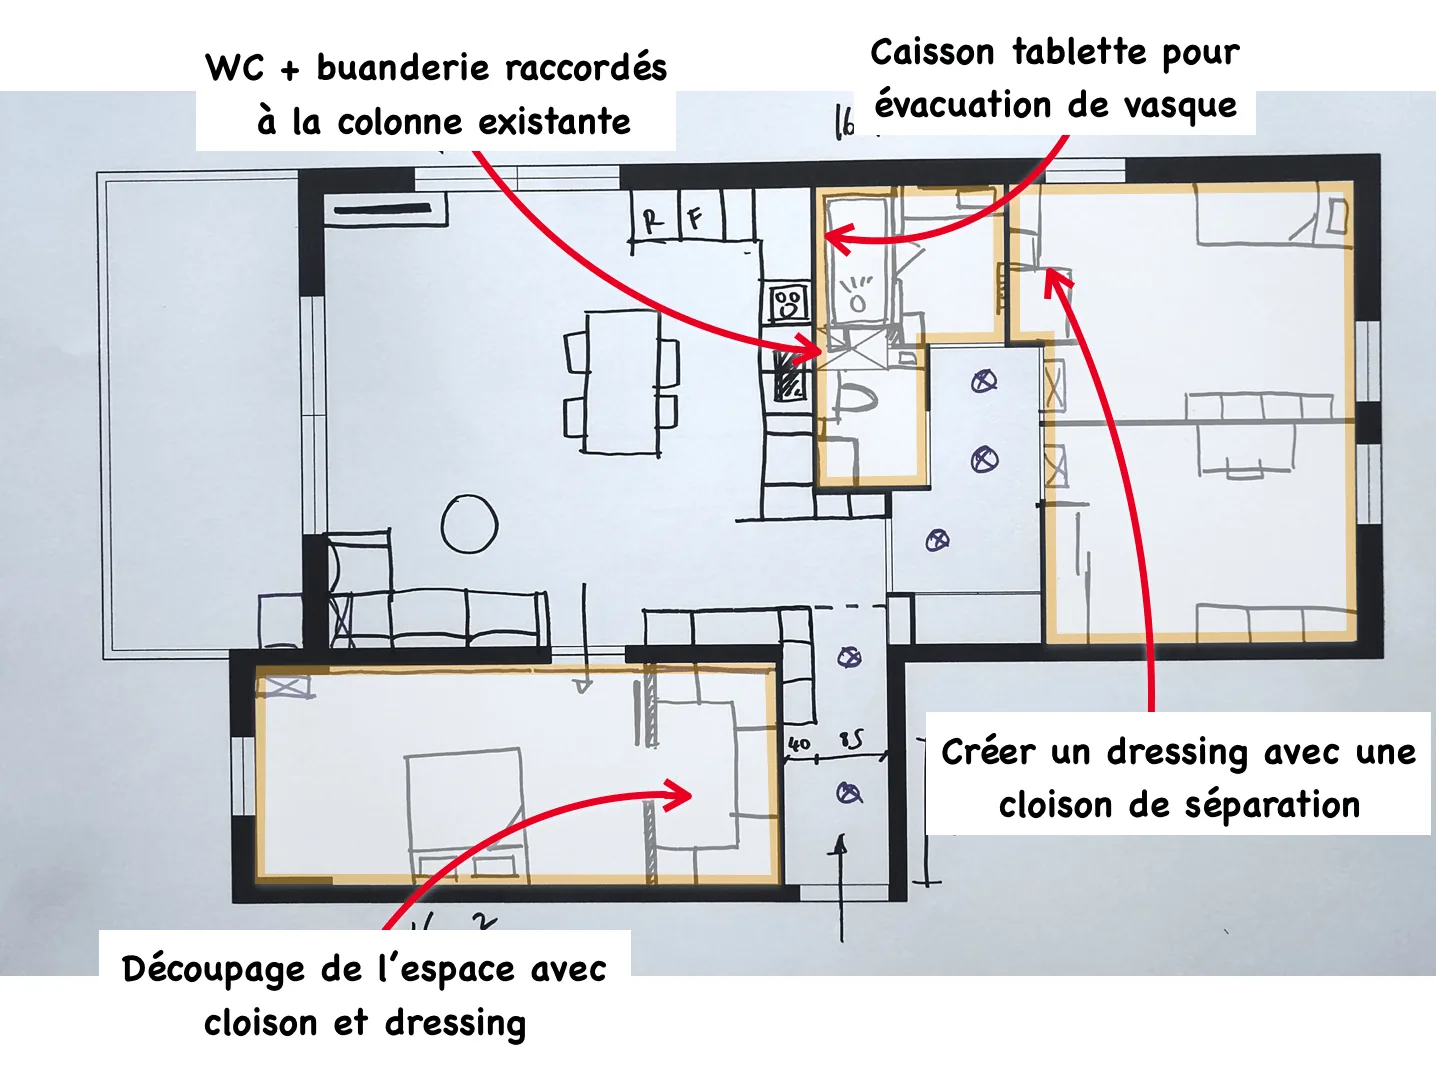
The recorded furniture package combines IKEA cabinet bodies with Plum Living fronts. The listed amounts are 500 euros for the cabinet bodies, excluding doors; 1,400 euros for the fronts; 200 euros for the worktop; and around 400 euros for assembly and installation.
Note: prices are indicative, based on projects in France in 2026, and vary by project, region and finish.
That gives an approximate 2,500-euro package for the entry furniture. The installation allowance does not include the project’s drywall, painting or floor finishes. It is not the total apartment-renovation budget, and “all included” should be understood only within that stated furniture scope.
These are historical project figures, not a current quotation or an assumption about equivalent prices in the United States or Spain. The useful design principle is the combination of standard cabinet structures and selected fronts and finishing pieces, rather than treating every part as custom-made.
A wider entry, or one that can borrow area from a neighboring room, may permit a deeper closet, under-seat storage or a more substantial niche. The entry with closet, storage and a bench article explores that different starting point.
Make the back of the furniture useful too
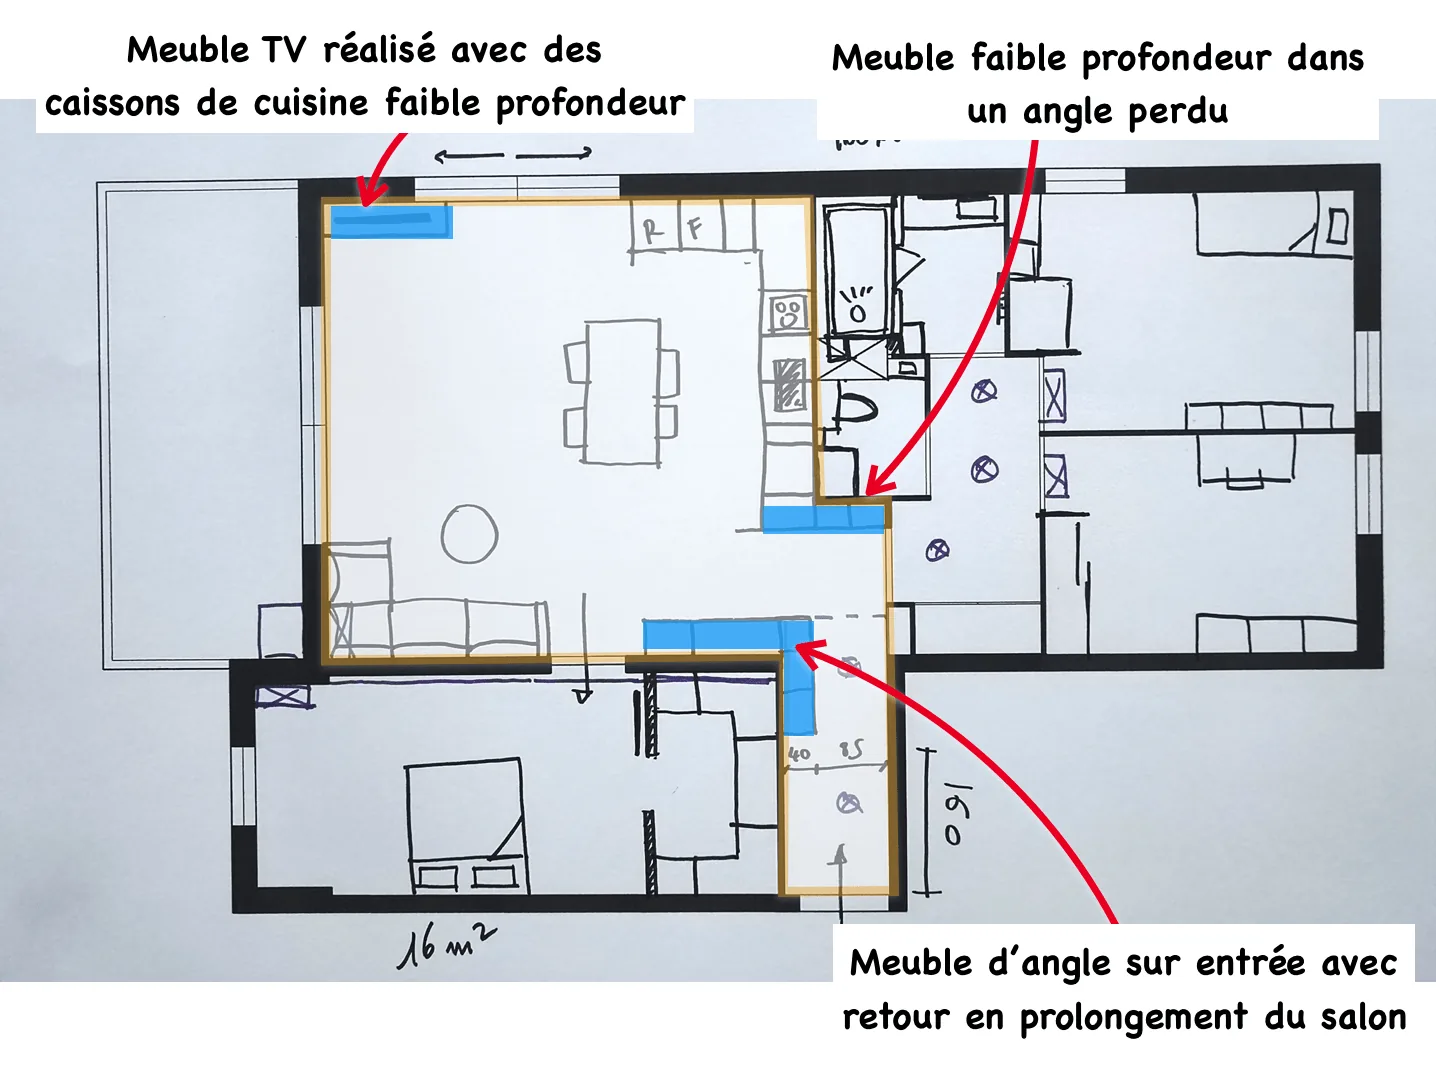
The central move is a two-sided composition. The entry unit’s back becomes storage accessible from the living and kitchen side, instead of an unused panel facing the common room.
One assembly can therefore serve arrival, support the kitchen and contribute to the lounge. It connects the three functions without adding a full-height wall between them. The furniture’s relationship to the room matters as much as the contents hidden inside it.
Across the room, the television unit faces the sofa, slightly below the window. Its position is coordinated with the kitchen cabinetry and entry furniture. Related depths, fronts and storage intentions allow the eye to read a continuous composition rather than three unrelated purchases.
Recover the wall offsets for the kitchen
The new kitchen uses the existing wall’s S-shaped geometry. A shallow offset that previously had little practical value becomes part of the work and storage arrangement. Reduced-depth cabinets take advantage of it without projecting as far into the living area.
The equipment sequence includes two tall units, a corner cabinet, cooktop, dishwasher, sink, a pullout cabinet, an 80 cm cabinet and shallower storage along the return. Refrigerator and oven are grouped, with the oven at the lower level described in the design.
This is not a smaller kitchen stripped of equipment. It is a more closely fitted kitchen that leaves more room for the shared living functions. The 250 cm return that previously dominated the room no longer determines the whole layout.
The design notes use 90 cm between facing worktops as a planning reference. Verify that space against appliance openings, actual users and applicable requirements; it is not a universal guarantee of comfortable or accessible use. The wall shape and cabinet widths must be checked together on the detailed plan.
See our projects in video
Real floor plans and renovations explained step by step on the ArchiWorking YouTube channel. Watch how spaces are reworked before the works begin.
Let the living and dining arrangement regain space
An L-shaped sofa occupies the lounge opposite the coordinated storage. A centrally placed extendable table can accommodate up to 12 people in the arrangement described by the project, replacing the former fixed table.
Its expandable format helps free access to the large glazed opening in everyday use. The extended position still needs its own clearance check; a stated seating capacity is not proof that every chair and route will work in every configuration.
This approach connects the entry, kitchen and lounge through the same plan rather than enlarging one at the expense of an unexamined neighbor. The 105 m² apartment study, from tracing-paper sketch to primary suite, explores a broader redistribution with a related concern for overall coherence.
Close the primary closet, then reassign the secondary rooms
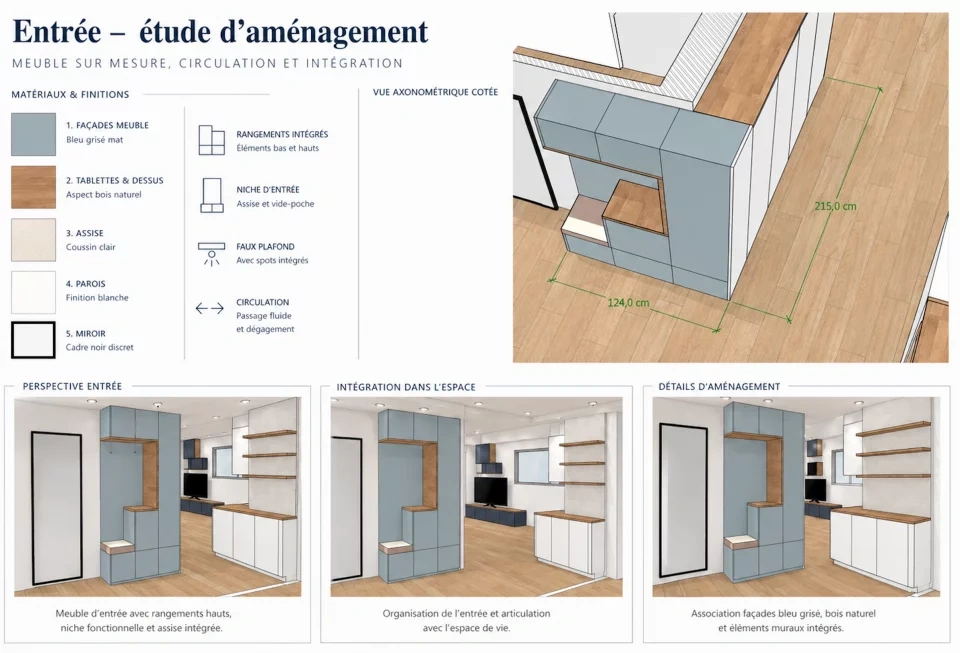
The primary bedroom is 16 m². Its door naturally divided the room into two parts. The design uses that organization to form a U-shaped closet behind a sliding door, without changing the room’s enclosing partitions.
The owner’s request was to stop looking at open storage from the bed. The enclosed closet answers that visual priority while developing hanging space along the available sides. The change is therefore about the relationship between sleeping and storage, not merely adding more wardrobe volume.
The child’s bedroom and office switch places to improve their relationship to daylight. The child receives the room with the double-window opening. An extended partition accommodates a large shallow furniture composition combining storage, a desk and a single bed.
The other room becomes the office, with a double sliding-door arrangement, a storage column and a worktop opposite in a well-lit position. Swapping uses allows the existing openings to serve the household more deliberately instead of leaving room labels fixed by habit.
Turn the toilet room into a coordinated utility zone
The original toilet orientation wasted useful space and there was no laundry provision. The revised layout turns the toilet so that a wall-hung fixture occupies a recess. A handwashing basin allows guests to use the room without moving into the shower room afterward.
The released space accommodates the washing machine and a technical enclosure for drainage, creating an independent utility arrangement. The toilet, small basin and laundry equipment share a coordinated technical zone rather than scattering water-related tasks through the apartment.
Their drainage is grouped around the same service column. That can limit unnecessarily long branches, but the actual routes and connections still need to be checked. A neat plan should not be confused with a completed plumbing design.
Replace the bathtub with a 160 × 80 cm shower
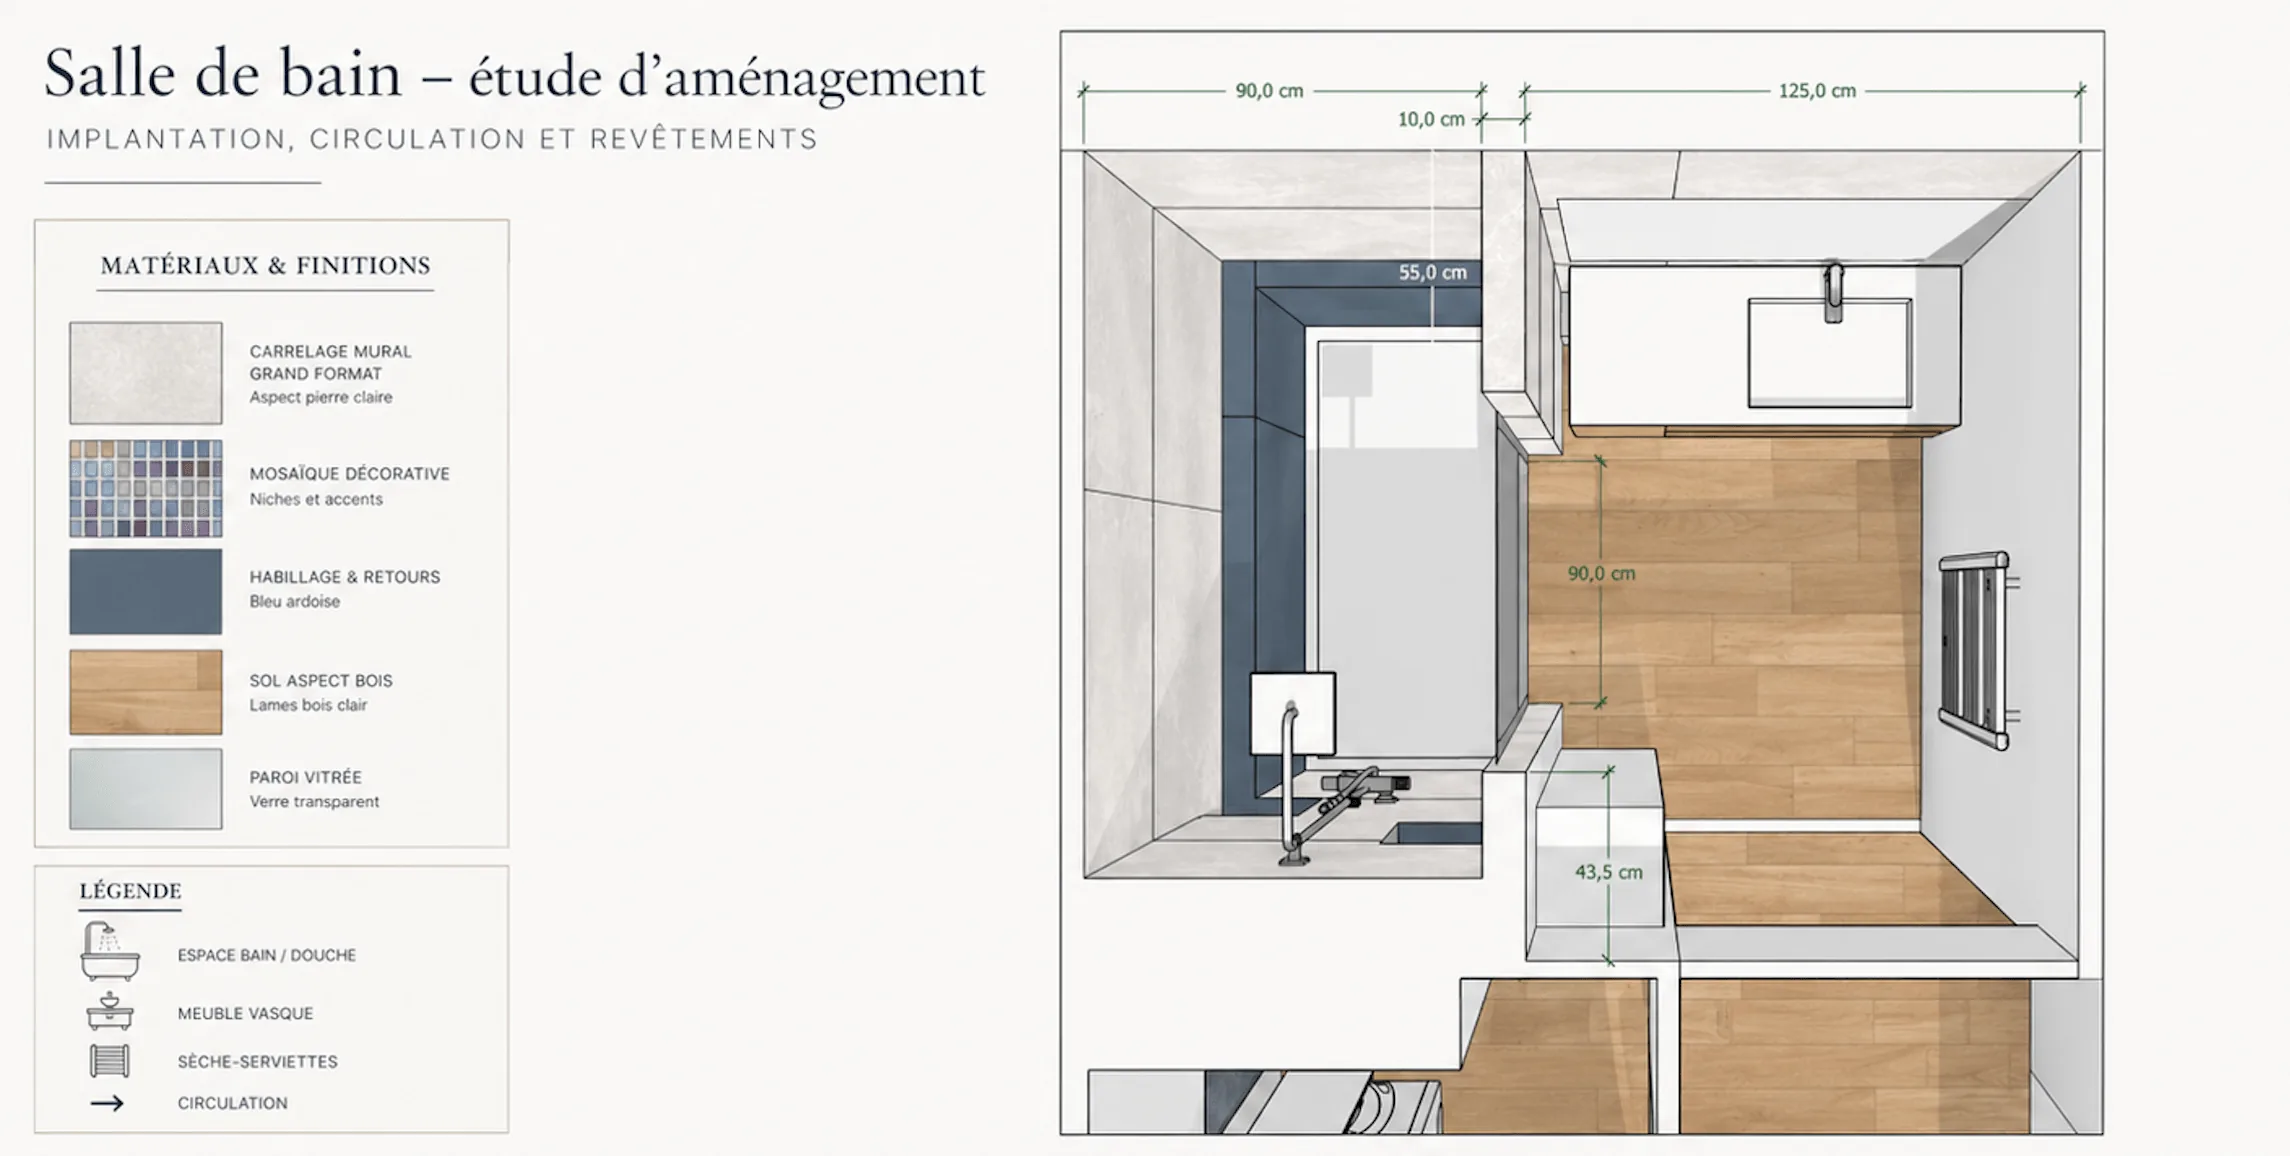
The owner’s initial wish was a large shower and a double-basin arrangement with counter space. The illustrated proposal replaces the bathtub with a 160 × 80 cm tray, partial-height divisions and a door opening.
The existing service enclosure was too short for that tray. Extending it by a few tens of centimeters resolved the layout without a major wall alteration. This relatively discreet dimensional change controls the whole shower position, which is why it needs checking at survey stage.
A ledge at 90 cm provides space for toiletries as the enclosure is reorganized. A deeper, doubled lining accommodates niches on the shower side and conceals services through the remaining height. Wet-area construction and the final junctions must be detailed appropriately; a decorative recess alone does not resolve them.
The proposed vanity is 1.20 m wide with an offset basin, leaving countertop to one side. That is the illustrated solution, distinct from the initial request for two basins; the final agreement must make that choice clear rather than claiming a double basin has been installed.
An illuminated mirror spans the vanity. A towel warmer sits to the side, with a possible storage column in the small remaining area. Wood-look flooring and mosaic finishes establish the material relationship without relying on a more complicated tile layout to organize the room.
Coordinate air conditioning with the ceiling work
Air conditioning was also requested. Two indoor split units are positioned: one above the sofa for the living area and another in a corresponding arrangement for the primary bedroom.
The connections run in a technical enclosure above doors and cabinetry toward the entry, where a localized suspended ceiling is created. Recessed lights become part of that ceiling, giving the entry a lighting composition as well as a place for services.
The primary bedroom and living area also use ceiling zones with integrated lights. Condensate is routed toward the existing wet rooms. Those drainage connections, service access and installation conditions require appropriate technical detailing.
The benefit is a reduction in visible routes and wall chasing, not a promise of work without any drilling or openings. Ceiling drops also occupy height, so their extent belongs on the same coordinated drawing as the cabinetry and lighting.
Read the apartment as one plan
The entry, lounge and kitchen are intended to read as a continuous interior. Storage belongs to the routes, bedrooms follow their occupants’ real uses, and services are coordinated rather than disguised at the end.
That coherence can come from an entry cabinet’s reverse side, a different cabinet depth or a small extension to a service enclosure. It does not always require moving every wall. The kitchen relocation that creates another room shows a different scale of intervention, governed by the same need to resolve dimensions first.
Questions about this apartment layout
Does shallow entry furniture always provide enough storage?
It depends on the contents. Here, the planned unit combines daily shoes, jackets, small items and a seat. A deeper closet belongs to a different width and circulation assessment.
Is an 85 cm passage automatically compliant?
No. It is a project dimension, not a universal standard. Check the location, users, doors and applicable access requirements; the separate 160 cm note also needs verification on the drawing.
Does this floor area alone determine professional or permit requirements?
No. The work’s scope and local rules matter. Furniture planning, structural changes, plumbing and air-conditioning installation do not all carry identical requirements.
Can ceiling work hide the air-conditioning connections?
It can form a coordinated service route, as proposed here. Remaining headroom, condensate disposal, maintenance access and actual installation requirements still need checking.